After answering many user questions on WordPress support forum, I compiled a comprehensive guide on how to use Tiny Framework/Forge WordPress theme and its child themes. I hope it will give you a confident start and encourage you to begin your own coding journey!
Quick start guide
- Learning WordPress coding. The concept of "Tips".
- Task 1: Use child theme or not?
- Task 1.1: Use Web Developer Tools
- Task 2: Set up Footer Copyright Widget Area
- Task 3: Theme Customizer options
- Task 4: Icon webfont for social networks (optional)
- Task 5: functions.php settings
- Task 6: Make it look clean (optional)
- Task 7: Maintain fully accessible website (recommended)
Donate if you like this theme and free support!
General elements
- Site
- Header
- Header and logo configuration options
- Enable custom logo for mobile view
- Custom header image for each page or post
- Rotating header images
- Disable featured image custom header in posts and pages
- Permanently change default header image height
- Move top navigation menu below the header image
- Increase depth level for sub-items of top navigation menu
- Head, header coding Tips
- Navigation
- Content
- Make content area wider or narrower
- Display posts on front page only from a featured category
- Display featured image thumbnail in archive views (index page, categories, etc.)
- Display full posts on front page only (Excerpts for Search, Archives and additional pages of Index view)
- Post and page titles: enable HTML code in title
- Images: disable border (shadow) on specific images
- Links: disable external link icon on specific links
- Content coding Tips
- Sidebar
- Footer
- Buttons
- Alerts
- Icon webfont
- Embedding code in the post
Other theme tweaks
- Custom CSS classes
- Custom Action Hooks
- Theme localization (translations)
- Additional coding Tips you'll find in this theme
- LESS dynamic stylesheet language support
Problems you might face
Learning WordPress coding. The concept of "Tips".
With its unique "Coding Tips System" Tiny Framework helps to understand how to extend parent themes and build your own child themes, hacking them the way you want.
This WordPress theme does not offer million customization options, how do you expect to learn WordPress development if you will never open a file in a text editor? Instead Tiny Framework has small pieces of code that (un)locks various features and lets you do things yourself by guiding you through the files and code lines.
Learning experience in Tiny Framework is provided in three flavors:
- Coding Tips are baked in the theme itself.
- Tutorials cover less common features.
- Child theme example will provide you a solid starting point and teach most important child theme development techniques.
Many features of this theme and its child themes are thoroughly commented and marked as a "Tip" with a distinct number. For example Tip01 shows how to include additional CSS and JavaScript files the right way - via functions.php file. Just open functions.php file in a text editor, search for "Tip01" and you're there! If there would be additional code components dealing with this Tip in other files, you could easily find the code by opening those files and searching for "Tip01" - no more searching for the needle in the haystack!
You will find all Tips listed in this guide according to their place in document structure. Next to the Tip you will find a list of files that include related to that Tip code pieces. Eg.:
Tip40 - Optional post thumbnail (Featured Image) on index/archive views (style.css, inc/template-tags.php , template-parts/content.php) - can also be used in child themes.
Why should you consider using a child theme?
The way WordPress works, each time you update a theme, its folder would be overwritten with new version. That means if you want to make changes to the theme and retain them, you have two choices: use a custom CSS plugin, where you would store all new CSS styles, or use a child theme, that you would modify.
First choice is good for users who will do only small changes, that can be achieved by modifying CSS styles. In this case you would append new CSS styles with the help of a plugin. If you're using popular Jetpack plugin suite, it has a Custom CSS module, other plugins to consider: Advanced CSS Editor (recommended), Simple Custom CSS, Improved Simpler CSS.
With the arrival of new theme version, you could update theme, because all your custom CSS styles would be safely stored in the database.
If you plan to make more considerable changes to the theme, I would suggest using a child theme. New WordPress users do not know how to create a child theme, for that purpose I included an example of a child theme with main Tiny Framework download under inc/examples/tiny-framework-child
Open new page in your web development book ant start usining Firefox Page Inspector (a part of Web Developer Tools in Firefox) and/or Google Chrome DevTools (also check this page) to see what styles are affecting the web page elements.
You can activate these tools in both browsers with: CTRL+SHIFT+I and select the element you need with the mouse. Similarly you can use F12 Developer Tools in Internet Explorer with F12.
See video tutorials about Firefox Inspector, Chrome Developer Tools and Internet Explorer F12 Developer Tools.
How to install a child theme. First you have to download main theme - official release or latest development version. Unzip parent theme file and then locate child theme files in: inc/examples/tiny-framework-child.
If you can use FTP client (eg. FileZilla), upload the folder of a child theme as a separate theme alongside with Tiny Framework parent theme to you web server (both themes should be uploaded for child theme to work):
wp-content/themes/If you cannot use FTP client, you can still upload theme as a zip file in WordPress Admin panel:
Appearance > Themes > Add New Theme > Upload Theme (button at the top)In this case zip the child theme folder and upload the zip file!
Activate Child theme and you're ready to go! From that point all of your changes will be done in the child theme. If you need to modify a file, but it isn't present in your child theme's folder, just copy it there from the Tiny Framework theme.
As a bonus, Tiny Framework child theme has very nice search field in the top menu area (ported from Twenty Thirteen theme) and two new header images to give you an example on how to change the default header images in the child theme. To activate search field you have to create a menu and assign it as primary, see: Task 3: Theme Customizer options.
Tiny Framework child themes
Extend Tiny Framework with additional child themes
Additional resources about child theme tweaking/development, that you might find useful:
- How to Modify the Parent Theme Behavior Within the Child Theme
- Twenty Twelve – Three Column Layout Tutorial
- Read WordPress Codex for more info about child themes
Set up Footer Copyright Widget Area
In WordPress Admin panel go to:
Admin. panel > Appearance > Widgetsexpand Footer Copyright Widget Area on the right side, drag a standard Text widget from the left side to the widget area, enter your copyright text in the text field (leave the title field empty):
© 2017 Your Name. All rights reservedCustomize appearance with Theme Customizer
Go to Theme Customizer and see if you need to change any visual aspects of your site.
Admin. panel > Appearance > CustomizeIf you already created a menu, assign it as primary in Navigation.
You can also create a menu and assign it as primary in:
Admin. panel > Appearance > MenusAt the top see: "Select a menu to edit, or create a new menu." and create a menu if it's a fresh WordPress install. Then at the bottom check "Theme locations: Primary Menu" and save the menu.
For info about customizing Site Header and custom logo please see: Header and logo configuration options.
Icon webfont for social networks (optional)
New method (an easy one)
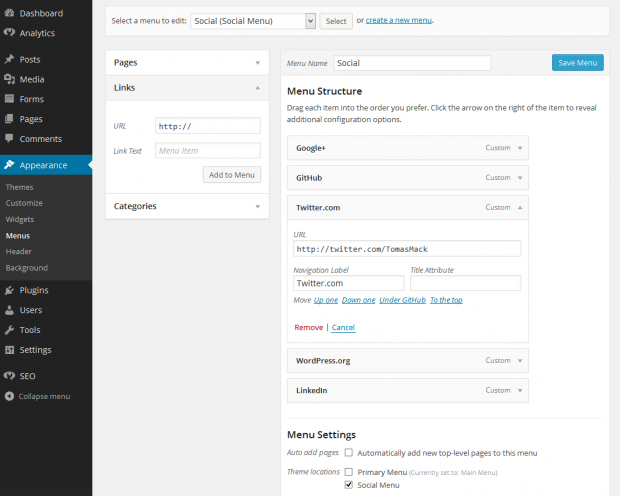
Using this method (created by Justin Tadlock) you would create new menu, name it "Social" or other name and assign it as "Social Links Menu" (the check box at the bottom). Then you can add your social profiles as Links. By default social icons would be displayed on the right side of the footer.
If you want to change the way Social Links Menu is generated, check the inc/menu-social.php, also search for Tip85 in style.css and footer.php. If you want to display Social Links Menu in the header, see Tip85b.
You can add this Social menu in any place of the theme using code:
<?php get_template_part( 'inc/menu', 'social' ); ?>Currently supported networks:
"Old school" method (for code wranglers and geeks)
Psst! Even if you're geek, you can use the "easy" method too, your clients will like it 😉
You could use this method also in those cases, when you need to display social icons in widgets and other places. Use standard Text widget in the Main Sidebar widget area (same instructions as with Footer Copyright Widget) with text like this:
<a href="http://address-to-about-me-page" class="icon-webfont social-link fa-pencil"><span class="screen-reader-text">Contact me</span></a>
<a href="http://address-to-facebook-account" class="icon-webfont social-link fa-facebook-square"><span class="screen-reader-text">Facebook</span></a>
<a href="http://www.linkedin.com/in/your-profile/" class="icon-webfont social-link fa-linkedin-square"><span class="screen-reader-text">LinkedIn</span></a>
<a href="http://profiles.wordpress.org/your-wp-name" class="icon-webfont social-link fa-wordpress"><span class="screen-reader-text">WordPress.org</span></a>
<a href="http://twitter.com/your-twitter-handle" class="icon-webfont social-link fa-twitter"><span class="screen-reader-text">Twitter</span></a>
<a href="https://plus.google.com/your-g-plus-account-number" class="icon-webfont social-link fa-google-plus-square" rel="author"><span class="screen-reader-text">Google </span></a>
<a href="http://github.com/your-github-name" class="icon-webfont social-link fa-github"><span class="screen-reader-text">Github</span></a>
Search for Tip86 in style.css to adjust CSS style. Read more about icon webfont implementation.
Take a look at functions.php settings
Open functions.php file in a text editor and find sections:
1.4 in child themes (9.0 in parent theme) - Footer credits - Tip87 - Action Hook implementation example

2.2 in child themes (6.0 in parent theme) - Add optional meta tags, scripts to head

3.0 in child themes - Functions to optimize performance

4.0 in child themes - Functions to increase security

5.0 in child themes (12.0 in parent theme) - Other functions
Check if you need to enable (uncomment) any of the functions there. If you enabled humans.txt meta tag, open inc/humans.txt file in text editor and update it with your own information. Read more about humans.txt initiative.
Make it look clean (optional)
Personally I'm not a fan of displaying a bunch of meta data on index page or on archive pages. I try to keep it as clean as possible to not mess with readers' attention. Unfortunately I had to enable all that meta info to pass theme evaluation. However it is very easy to fix this 😉
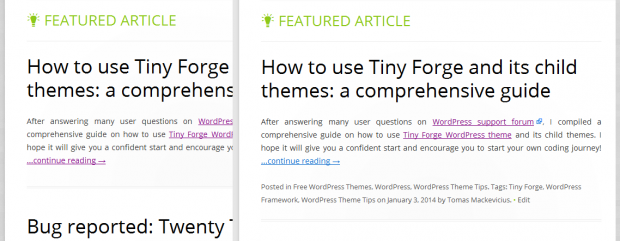
To disable entry meta, located below the post in index/archive view, open style.css file in a text editor and search for Tip30, then uncomment next CSS block to hide entry meta section (with author, categories, tags) in the Index page and archive listings.
Maintain fully accessible website (recommended)
As you probably noticed, accessible WordPress themes have special "accessibility-ready" tag. It basically means that this theme produces accessible website on clean WordPress installation. It also means, that after some user actions website might not be fully accessible anymore. That's right, website owners can negatively affect accessibility of their own websites. Here are several precautions and tips to keep your website accessible.
Headings play a big role in providing web accessibility and can have potential impact for website's SEO. Knowing that, users should use headings in their produced content following main heading structure of a theme.
H1 is reserved to describe one most important item on a page, usually post/page title. H2 is used to outline main website document structure and H3 is used to describe less important page elements, like widgets, etc.
Tiny Framework users should use headings in posts and pages starting from H2 and starting from H4 for the content inside the widgets.
Use headings in a consistent manner, don't skip or mix them up, eg.
<H2>...
	<H3>...
		<H4>...
<H2>...
But not:
<H2>...
	<H4>...
		<H3>...
<H2>...
Basically, you have to start with highest heading (H2 for content and H4 for widgets) and then use lower importance headings if needed. If you would think that visually lower importance heading, eg. H4 looks better, you would not use H4 after H2, but instead you would alter the CSS style of H3 to match your needs. This would give you the desired look and would not break the logical structure of a document.
If you will decide to change color and/or background of text elements, always check if new color combination conforms to web accessibility requirements. This requirement is also valid for the states of a text or link: :hover, :focus, :active, :visited.
If you upload images that add value to the content, please do not forget to provide Title description and/or Alt Text description in media uploader. If Alt Text field of media uploader is empty, WordPress will use Title field instead. So at least one of the fields should be provided.
If you will use alert boxes, apply alert-link class for the links inside alerts.
Site
Theme document structure
This might help you when applying CSS rules to see the "Cascades" of Cascading Style Sheets.
Example for single.php
<body <?php body_class(); ?>>
	<div id="page" class="hfeed site">
		<header id="masthead" class="site-header" role="banner">
			<div class="site-branding">
				<a class="custom-logo-link" rel="home" href="">
					<img class="custom-logo">
				<div id="site-title-wrapper">
					<h1 class="site-title">
					<h2 class="site-description">
			<nav id="site-navigation" class="main-navigation" role="navigation">
		<div id="content" class="site-content">
			<div id="primary" class="content-area">
				<main id="main" class="site-main" role="main">
					<article id="post-<?php the_ID(); ?>" <?php post_class(); ?>>
						<header class="entry-header">
							<h1 class="entry-title">
							<div class="entry-meta">
						<div class="entry-content">
			<aside id="secondary" class="widget-area" role="complementary">
				<section id="recent-posts-5" class="widget widget_recent_entries">
					<h3 class="widget-title">Recent Articles</h2>
						<ul>
							<li>
		<footer id="colophon" class="clear" role="contentinfo">
			<div id="footer-widgets" class="widget-area three">
				<div id="footer-widget-left">
					<section id="recent-posts-4" class="widget widget_recent_entries">
						<h3 class="widget-title">Recent articles</h2>
							<ul>
								<li>
Archive example for category.php (different is only #primary).
			...
			<section id="primary" class="content-area">
				<main id="main" class="site-main" role="main">
					<header class="page-header">
						<h1 class="page-title">
					<article id="post-<?php the_ID(); ?>" <?php post_class(); ?>>
						<header class="entry-header">
							<h1 class="entry-title">
							<div class="entry-meta">
						<div class="entry-content">
			...
Customize color scheme
Open style.css file in a text editor and starting from the beginning, search for "Tip88" to quickly find CSS rules responsible for the colors of main theme elements.
There are many instances of Tip88, so after changing the first one, keep going, including the media queries... 😉
This can be done faster by using LESS.
Make whole site wider or narrower
In this example I will alter CSS rules and some theme files (indicated by bold text) to make site 1200px wide. To achieve this, content area should be 1120px wide.
If you're using Tiny Framework without a child theme, find these style.css file sections and edit/append the code.
If you're using Tiny Framework with a child theme, copy these snippets of code to child theme's style.css according to section numbers:
/* 12.0 Footer */
.site-footer {
	max-width: 1120px;
	max-width: 70rem;
}
/* 15.1 Minimum width of 770 pixels */
@media screen and (min-width: 770px) {
body .site {
max-width: 1200px;
max-width: 75rem;
}
/* Compatibility for older IE browsers */
.ie body .site {
max-width: 1200px;
}
}Now we have to set new width for header images and max-width for content pictures and videos. If you're using Tiny Framework without a child theme, in functions.php edit the lines:
// 3.10 - Tip07 - Add new image size for custom post/page headers and select default header image.
add_image_size( 'custom-header-image', 1120, 9999 ); // Unlimited height, soft crop
And under section 4.0 - Theme setup - Part 2 right after function tinyframework_content_width:
if ( ! function_exists( 'tinyframework_mod_content_width' ) ) :
/* Adjust content width in certain contexts.
 *
 * Adjust content_width value for full-width and single image attachment templates, and when there are no active widgets in the sidebar.
 *
 * template_redirect fires a lot later than after_setup_theme so that will still change the variable as usual.
 */
function tinyframework_mod_content_width() {
	if ( is_page_template( 'page-templates/full-width.php' ) || is_attachment() || ! is_active_sidebar( 'sidebar-1' ) ) {
		$GLOBALS['content_width'] = 1120;
	}
}
endif;
add_action( 'template_redirect', 'tinyframework_mod_content_width' );
For the child theme, you will have to copy this modified tinyframework_mod_content_width function.
To maintain logical structure of the child theme's functions.php file I would put this and next function somewhere in the section: 1.0 - Parent theme's functions you can override.
Also for the child theme you will have to copy whole tinyframework_setup function from Tiny Framework functions.php and change Section 3.10:
if ( ! function_exists( 'tinyframework_setup' ) ) :
/**
 * 3.0 - Theme setup - Part 1.
 */
function tinyframework_setup() {

...

// 3.10 - Tip07 - Add new image size for custom post/page headers and select default header image.
add_image_size( 'custom-header-image', 1120, 9999 ); // Unlimited height, soft crop

...

}
endif; // tinyframework_setup
add_action( 'after_setup_theme', 'tinyframework_setup' );
To seal the deal, last change will be made in inc/custom-header.php. For the child themes you will have to copy custom-header.php to inc folder from the parent theme. Change just 'width' value:
'width' => 1120,After all changes were completed, try to upload new header image to see if it is sized and displayed correctly.
Header
How to customize Header and custom logo
If you want to use custom logo, there are two usage cases:
- Your self-hosted site runs WordPress 4.5 or newer version or site is hosted at WordPress.com.
- If you have self-hosted site that runs older WordPress version, you have to install Jetpack plugin.
Then go to Customizer and under Site Identity (used to be Site Title & Tagline) you can upload an image to use it as custom logo.
Admin. panel > Appearance > Customize > Site IdentityI recommend to size the custom logo height to 85px.
If you want to have a larger custom logo, that might even span through entire width of the Site header, just upload wide image (960px to span entire header).
Enable custom logo for mobile view
By default in mobile view custom logo is hidden. This is very practical decision - it's impossible to predict the parameters of user-uploaded Logo picture, so to avoid a distorted look, custom logo is hidden. Nonetheless if you want to enable it, it's just a few CSS lines away. Open style.css in text editor, search for the Tip14 and uncomment block of the code marked as "Enable custom logo in mobile view".
This results in a view like this:
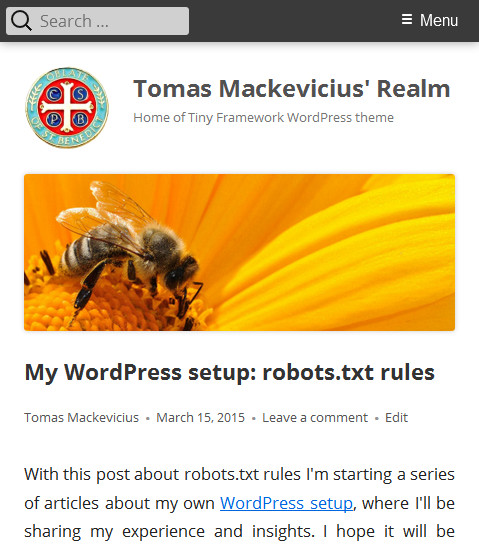
If you want to have a larger custom logo, that might even span through entire width of mobile view, just upload wide image (960px to span entire header), or if logo is smaller, you may try to increase Logo image and make it responsive by adding a couple of CSS lines (change the % value according to your needs):
.custom-logo-link {
    width: 100%;
}
You might need to add padding and/or margins to make it look perfect 😉
Custom header image for each page or post
Select Featured Image for every page/post. There is a menu box on the right sidebar of WordPress page/post editor. Upload or select from Media Library an image that would be at least 960px wide.
Those pages and posts that do not have Featured Image assigned will display main header image that was set for the whole site in Customizer.
Rotating header images
If you want to have rotating header images, upload several images:
Admin. panel > Appearance > Customize > Header Image > Add new imagethen select the option: "Randomize headers". All pages and posts that do not have designated Featured Image, will show those header images. Same applies to categories.
If you want to replace default header images with your own, look at the images/headers inside the theme folder and replace images keeping their names the same.
Disable featured image custom header in posts and pages
Sometimes you may want to use Featured Images in excerpts on Index page or in Archive views, but you don't want them to be displayed as a header image - you want a header image to show up only on the main page. If you want to disable this so that Featured Images don’t show up in the post, you would have to copy header.php from the parent theme to a child theme and then this part of the code:
<?php
/* The header image
 *
 * Check if this is a post or page, if it has a thumbnail, and if it's a big one
 * You can also check if it's not password protected, just add this condition: && ! post_password_required()
 */
if ( is_singular() && has_post_thumbnail( $post->ID ) &&
		( /* $src, $width, $height */ $image = wp_get_attachment_image_src( get_post_thumbnail_id( $post->ID ), array( $header_image_width, $header_image_width ) ) ) &&
		$image[1] >= $header_image_width ) :
	// Houston, we have a new header image!
	echo get_the_post_thumbnail( $post->ID, 'custom-header-image', array(
		'class'    => 'photo u-photo', // At this point using a work-around: https://core.trac.wordpress.org/ticket/36996#comment:3 that is added as 12.5 in functions.php
		'id'       => 'featured-image', // Experimental! This ID (should it be #post-thumbnail ?) could be used for the itemref in the article element (in inc/semantics.php) for the Google AMP Articles Rich Snippets "Article image" validation.
		'itemprop' => 'image',
		) );
else :
	if ( function_exists( 'get_custom_header' ) ) {
		$header_image_width  = get_custom_header()->width;
		$header_image_height = get_custom_header()->height;
	}
?>
change to:
<?php
/* The header image
 *
 * Check if this is a post or page, if it has a thumbnail, and if it's a big one
 * You can also check if it's not password protected, just add this condition: && ! post_password_required()
 */
if ( function_exists( 'get_custom_header' ) ) {
	$header_image_width  = get_custom_header()->width;
	$header_image_height = get_custom_header()->height;
}
?>
and then remove this line:
<?php endif; // end check for featured image or standard header ?>Permanently change default header image height
Overall if you need to upload a header image with a different height than default one (350px) you do not need to do anything special, just upload the image and it will work. This tutorial is for those, who want the image cropping tool to be automatically sized to new height. It might be useful for your client to make site look uniform.
In the functions.php file of your child theme search for: 2.3 - Tip07 - Add new image size for custom post/page headers and select default header image.
Then just uncomment whole section: function tinyframeworkchild_custom_header_setup
and then inside the $args = array section uncomment only:
'height' => 350,
and change that number to your desired height, eg. 150.
Move top navigation menu below the header image
First copy header.php file from main theme to a child theme.
Then move the block of code starting and ending with:
<nav id="site-navigation"...
...
</nav><!-- #site-navigation --></nav>
below this line:
<!-- Custom Header - End -->You might need to adjust CSS styles to make it look perfect 😉
Increase depth level for sub-items of top navigation menu
By default top menu is 4 levels deep, in other words it can have a maximum 3 levels of sub-menu items. If you would create a sub-menu item deeper than that, it would be hidden.
This restriction was made to prevent very deep menus with long item names being cut off and displayed behind the viewport/visible screen area. It is especially possible if top menu item is in the right corner of top menu.
If you need to have a deeper menu structure, copy header.php file from main theme to a child theme. Then find this code:
<?php wp_nav_menu( array(
	'theme_location' => 'primary',
	'menu_id'        => 'primary-menu',
	'menu_class'     => 'nav-menu',
	'depth'          => 4,
	) );
?>
and change depth value to 5 or some other number you need.
Head, header coding Tips (01-20)
Just open related to the tip files in a text editor and search for a tip number, for example "Tip03" to find the code.
- Tip01 - Properly include (enqueue and/or register) CSS and JavaScript files via functions.php - in child themes
- Tip01b - Properly exclude (dequeue and/or deregister) CSS and JavaScript files via functions.php - in child themes
- Tip02 -
- Tip03 - We are people, not machines. Read more at: humanstxt.org. If you enabled
humans.txtmeta tag, openinc/humans.txtfile in text editor and update it with your own information (functions.php, inc/humans.txt) - also in child themes - Tip04 - Reminder to enable JavaScript. Tiny Framework uses icon webfont, which will not be rendered properly if JavaScript is disabled (header.php, style.css)
- Tip05 - Mark main navigation menu items, containing children with special CSS class (style.css)
- Tip06 - Custom headers for posts and pages (header.php, style.css, also see Tip07)
- Tip07 - Add new image size for custom post/page headers and select default header image - thanks to Paulwpxp (functions.php) - also in child themes
- Tip08 - Remove junk from head - disabled by default (functions.php) - only in child themes
- Tip09 - Remove WordPress version info from head and feeds - better for security reasons - disabled by default (functions.php) - only in child themes
- Tip10 - Add Twenty Thirteen search form to WordPress nav menu (functions.php, style.css) - in child themes
- Tip11 - Make site title and site description float (style.css) - in child themes
- Tip12 - Disable header image for the Front Page Template to have classic Twenty Twelve front page look. Also see Tip63 (style.css) - also in child themes
- Tip13 - Remove Open Sans (from Google Fonts) as default font (functions.php) - in child themes
- Tip14 - Custom logo feature support (functions.php, header.php, style.css, rtl.css, inc/template-tags.php)
Navigation
Top menu
How to create an empty placeholder menu item
Sometimes you want to have a menu item that serves just as a container for sub-items (without linking to any actual pages):
- Create a link menu item with any link address (you should enter something there, otherwise WordPress will not let you to create the menu item).
- When it is already created, edit it by deleting the link address.
This way you will be able to stack other items under it, but you will not have to create an extra page, sometimes it may be confusing for users too, because it leads them to unnecessary navigation actions that do not provide any information at all. Also you will save some time by not creating a "filler" pages 🙂
Post navigation
Set Next and Previous post links to be from the same category (taxonomy) as current post - see Tip91
Sometimes you have very distinct categories on your site, e.g. Blog and Events. By default at the bottom of a post the links to Next and Previous posts would be provided chronologically - from any category. Logically if your user is reading an article about event, you would like to display the links to other articles about events.
To make this theme customization, you have to edit single.php file. If you're working with a child theme, copy single.php from Tiny Framework and then look in the file for a Tip91 for further directions.
Content
Make content area wider or narrower
If you're using Tiny Framework without a child theme, find these style.css file sections and edit the code. If you're using Tiny Framework with a child theme, first you will have to uncomment these sections and then edit them.
CSS rules responsible for content width are located in the section "15.1 Minimum width of 770 pixels":
.content-area {
	float: left;
	width: 65.104166667%;
}
Right next to it you will find CSS rules for the sidebar width. Accordingly, to adjust width of the sidebar you would edit percentage in:
.widget-area {
	float: right;
	width: 30.5%;
}
Remember, that by increasing the width of the content area, you have to decrease the width of sidebar widget area by the same amount, otherwise whole sidebar will be dropped to the bottom. As an example, you could use values of: 75.104166667% and 20.5%.
Display posts on front page only from a featured category
If we selected "latest posts" option for our front page:
Admin. panel > Reading Settings > Front page displays: Your latest postsby default all newest posts would be displayed. Sometimes it is not the best option, because not all posts have the same "weight". In this case we could create a specific post category, e.g. "Posts on Home Page", assign most important posts to this category and add this code to functions.php (please update the category ID number):
/**
 * On the Home page show only the posts from the category "Posts on Home Page" with ID 9
 * @link http://wordpress.org/support/topic/display-only-one-category-on-home-page?replies=5
 */
function tinyframeworkchild_home_post_queries( $query ) {
  // only homepage and is the main query
  if ($query->is_home() && $query->is_main_query()){
     // display only posts in category with id=9
     $query->set('cat', 9);
     // avoid sticky posts
     // $query->set('post__not_in', get_option( 'sticky_posts' ) );
  }
}
add_action( 'pre_get_posts', 'tinyframeworkchild_home_post_queries' );
This example is provided for the child theme, if you want to use it in Tiny Framework, replace tinyframeworkchild with tinyframework.
Display featured image thumbnail in archive views (index page, categories, etc.)
Code related to this tutorial is marked as Tip40 - Optional post thumbnail (Featured Image) on index/archive views (style.css, inc/template-tags.php , template-parts/content.php) - can also be used in child themes. You can enable it in style.css - search for "Tip40".
By default for a thumbnail medium_large size of the centered image will be used. If you need to change the image size, you can adjust it by copying function tinyframework_post_thumbnail from inc/template-tags.php to your child’s functions.php and changing the size. We can modify original function:
function tinyframework_post_thumbnail() {
	// Show post thumbnail only under certain conditions
	if ( post_password_required() || is_attachment() || ! has_post_thumbnail() ) {
		return;
	}

	if ( !is_single() ) : ?>

	<a class="post-thumbnail" href="<?php the_permalink(); ?>" aria-hidden="true">
		<?php the_post_thumbnail( 'medium_large', array(
			'alt'      => the_title_attribute( 'echo=0' ),
			'itemprop' => 'image',
			) );
		?>
	</a>

	<?php endif; // End !is_single()
}
to:
function tinyframework_post_thumbnail() {
	// Show post thumbnail only under certain conditions
	if ( post_password_required() || is_attachment() || ! has_post_thumbnail() ) {
		return;
	}

	if ( !is_single() ) : ?>

	<a class="post-thumbnail" href="<?php the_permalink(); ?>" aria-hidden="true">
		<?php the_post_thumbnail( 'medium', array(
			'alt'      => the_title_attribute( 'echo=0' ),
			'itemprop' => 'image',
			'class'    => 'alignleft',
			) );
		?>
	</a>

	<?php endif; // End !is_single()
}
Further style adjustments can be made in style.css.
Instead of medium you can also use thumbnail, large, full or a custom thumbnail size name that you can create in functions.php - search for the "Tip07".
Display full posts on front page only (Excerpts for Search, Archives and additional pages of Index view)
To make this theme customization, you have to edit content.php. If you're working with a child theme, copy content.php from Tiny Forge and then change this line:
<?php if ( is_search() ) : // Only display Excerpts for Search ?>to:
<?php if ( is_search() || is_paged() || is_archive() ) : // Display Excerpts for Search, Archives and additional pages of Index view ?>Post and page titles: enable HTML code in title
Since v1.5.4, Tiny Framework theme sanitizes title fields. That basically disables HTML code parsing in title field. If you really need this ability, below are the steps to enable HTML in title fields.
If you use Tiny Framework without a child theme, open functions.php in a text editor, find section 5.11 (Change title for protected and private posts...) and in tinyforge_the_title_trim function comment out this line:
// $title = esc_attr($title); // Sanitize HTML characters in the title. Comment out this line if you want to use HTML in post titles.If you use Tiny Framework with a child theme, open functions.php of a child theme in a text editor, find section 1.3 (Allow HTML in post title...) and uncomment tinyforge_the_title_trim function.
Images: disable border (shadow) on specific images
In case you need to display an image without any borders or shadows, include no-border class for the desired post image. Works for images in the content, as well in the widget areas. Tip24 is located in style.css. Example code:

<img src="http://your-site-url.com/wp-content/uploads/2013/11/image-620x465.jpg" alt="Image descr." width="620" height="465" class="aligncenter size-large wp-image-374 no-border" />Links: disable external link icon on specific links
Using external link that opens in a new window is a very hot topic in web development world. There are many opinions supporting it and going against it. But as it is with many things in the world, it depends on the situation...
Personally I do not like to be limited with "Back" button, because it creates a linear browsing experience, people are surfing internet in many directions these days. If I think that it would be a distraction for a reader to open link in the same window (because reader would have to go back and find where he left the article), I would always use target="_blank".
But when you have a situation where readers would have certain vision and other disabilities, opening link in a new window is not a good thing.
Even in this situation Tiny Framework tries to do the best - it displays "external link" icon - gives visual warning to reader and behind the scenes displays special comment for screen reader software: "Opens in a new window".

Tiny Framework appends nice icon to the links set open in a new window, indicating to the user that it is an external resource. But in some cases it is not the desired behavior, especially when linking images, see the example.
The good news - we have very easy way to avoid this - just add no-link-icon class to the desired link:

<a href="http://link-that-will-open-in-new-window.com" target="_blank" class="no-link-icon"><img src="http://source-of-your-image/image.jpg" /></a>If you want to disable external link icons for all content links of your site, please lookup Tip25b in style.css.
Content coding Tips (21-50)
Just open related to the tip files in a text editor and search for a tip number, for example "Tip03" to find the code.
- Tip21 - Icon webfont support implementation and examples (style.css, category.php, footer.php)
- Tip22 - Improve font rendering and fallback in Linux (style.css)
- Tip23 - Mark links to documents with corresponding icons for PDF, Word, Excel, PowerPoint and archive documents (style.css)
- Tip24 -
.no-borderCSS class - use it in case you need to display an image without any borders or shadows, includeno-borderclass for the desired image (style.css) - Tip25 - Mark the links that will open in a new window with special icon, usually these are the links to external resources (style.css, inc/functions.js)
- Tip25b - Disable special icons, that mark the links that will open in a new window (style.css)
- Tip25c -
.no-link-iconCSS class - use it to disable special icon, that marks the links that will open in a new window for an individual link, includeno-link-iconclass for the desired link (style.css) - Tip26 - Print HTML bellow post title with meta information for the current post date/time and author (functions.php, template-parts/content.php)
- Tip26b - Print HTML bellow post title with meta information (date/time and author) for the index/archive views in MOBILE and/or NORMAL view (style.css) - also in child themes
- Tip26c - Hide HTML bellow post title with meta information (date/time and author) for the posts in MOBILE and/or NORMAL view (style.css) - also in child themes
- Tip27 - Hide previous article - next article navigation below the content of a post (style.css)
- Tip28 - Remove curly quotes in WordPress (functions.php)
- Tip28b - Enable curly quotes in a child theme (functions.php) - only in child themes
- Tip29 - Style navigation arrows for post listing (next/previous page navigation) (functions.php)
- Tip30 - Hide entry meta section, located below the post (with author, categories, tags) in the Index page and archive listing (style.css) - also in child themes
- Tip31 - Google Fonts support - disabled by default (functions.php) - also in child themes
- Tip32 - Add shadow to post/page title (style.css) - also in child themes
- Tip33 - Enable hyphenation of text for
article. Please note that automatic hyphenation can reduce accesibility of the theme - it can cause strange pronunciation with screen readers (style.css) - also in child themes - Tip34 - Display image Description field content in attachment view (image.php). By default this is disabled, because some people use Description field for personal notes
- Tip35 - Jetpack Infinite Scroll support (style.css, inc/plugin-compatibility.php)
- Tip36 -
- Tip37 - Automatically style author's name in a blockquote. Author's name should be enclosed in
<cite>. (style.css) - can also be used in child themes - Tip38 - Overhanging/Pull Quotes (style.css) (only in child themes)
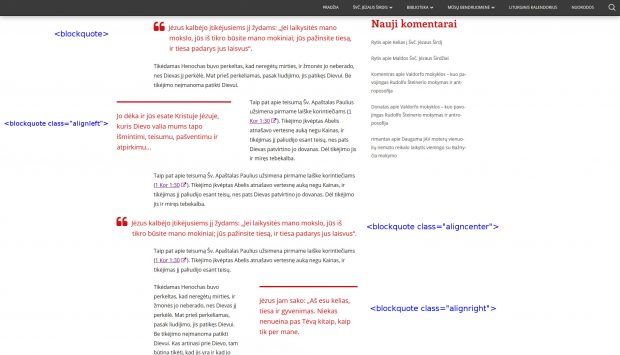
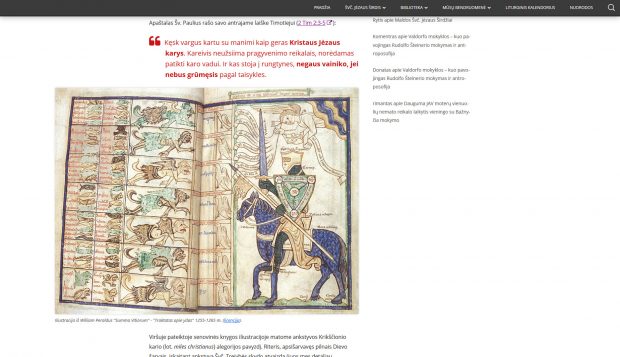
- Tip39 - Overhanging Images (style.css, js/custom-scripts.js) (only in child themes)
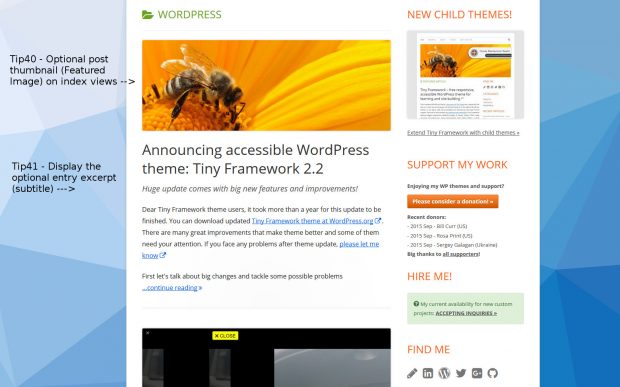
- Tip40 - Optional post thumbnail (Featured Image) on index views (style.css, inc/template-tags.php , template-parts/content.php) (can also be used in child themes). See the image below.
- Tip41 - Display the optional entry excerpt (subtitle) below the entry title (style.css, inc/template-tags.php , template-parts/content.php) (can also be used in child themes). By default this is disabled, because some people might use entry excerpt for other purposes, find Tip41 in
style.cssto enable.
Sidebar
Make Sidebar area wider or narrower
Please see the instructions at: Make content area wider or narrower.
Removing Sidebar
To completely remove a Sidebar for all posts, categories and pages - all widgets from the Sidebar Widget Areas in:
Admin. panel > Appearance > Widgetsshould be removed and Sidebar will disappear automatically.
If you want to remove a Sidebar for an individual page (this works only for pages, not for posts), in the page edit screen take a look at the Page Attributes menu section on the right side. There you can change a page template. In Template menu select the template named "Full-width Page Template". This should be done for each individual page that you want to use without a Sidebar.
Sidebar coding Tips (51-60)
Just open related to the tip files in a text editor and search for a tip number, for example "Tip03" to find the code.
- Tip51 - Show children items of Sidebar category/page menu for selected parent category/page only (style.css)
- Tip52 - Adjust default site layout for normal view (style.css) - also in child themes
- Tip52b - Change site layout (position of sidebar) for normal view (functions.php, style.css) - also in child themes
- Tip53 - Change vertical spacing between lines in Recent Posts widget. If your post titles are rather short,
12pxwill be a good choice (style.css) - also in child themes
Footer
Hide "Log in" link
To achieve this we need a simple CSS statement placed in style.css at the very end of section 3.6 Footer or at 14.3 Other styles.
#site-admin-link {
    display: none;
}
Hide Tiny Framework credit link
Open functions.php of the child theme and find Section 1.4 - Change/Remove Footer credits and uncomment the function:
tinyframeworkchild_remove_parent_theme_credits()
Footer coding Tips (61-80)
Just open related to the tip files in a text editor and search for a tip number, for example "Tip03" to find the code.
- Tip61 - Discreet link to WordPress Admin panel in the footer (footer.php, style.css)
- Tip62 - Add side borders for the middle footer widget - to better separate widgets visually (style.css) - also in child themes
- Tip63 - Disable footer widgets for the Front Page Template to have classic Twenty Twelve front page look. Also see Tip12 (style.css) - also in child themes
Adding buttons
All related CSS styles you will find in style.css section 4.2. In addition to general button styles, Tiny Framework uses Twitter Bootstrap style buttons. To add simple button, just create a link and apply specific style(s) to it = easy 🙂
<a href="http://your-button-link.com" title="Your button title" class="btn">Your button text</a>Bellow you can see examples and what effect each class gives to a button:
Check style.css file for more button styles.
Adding alert messages
All related CSS styles you will find in style.css section 14.1. Tiny Framework uses Twitter Bootstrap style alerts. To add an alert to the post, create a div with specific CSS classes.
<div class="alert alert-success">Your alert message.</div>Bellow you can see examples and what effect each class gives to an alert:
Links in alerts
Use the alert-link utility class to quickly provide matching colored links within any alert:
<a href="http://your-alert-link.com" title="Your alert link title" class="alert-link">Your alert link text</a>Default link colors, if used in alerts, would not comply with web accessibility text contrast requirements, that's why it's better to use alert-link class for the links inside alert boxes.
Icon webfont
In the theme and CSS style files I provided some examples on how to use icon webfont - search for icon-webfont class name and Tip21 (icon webfont support implementation and examples in style.css, category.php). Also please check: Icon webfont for social networks. CSS class names for other icons may be found in /css/font-awesome.css file and at: Font-Awesome icons (click on each icon to get detailed information).
Load FontAwesome from BootStrapCDN
Everyone wants website run faster. Overall loading CSS is recommended from your own domain - it is faster, because DNS will be resolved once. But every case might be different, so if you need to use CDN, just open functions.php and see Section: 5.2b (Section 2.6 in child themes).
Using icon webfont to style bullet list
Code that goes to your post text (in Text mode):
<ul class="list-icon-ok">
	<li>One</li>
	<li>Two</li>
	<li>Three!</li>
</ul>
Basically you create a normal list and add the list-icon-ok CSS class to ul element.
Code that goes to your style.css file (you don't have to copy this particular code, because it is already included by default, check section 14.2 FontAwesome webfont):
ul.list-icon-ok {
	list-style-type: none;
}
ul.list-icon-ok li {
	padding-bottom: 10px;
	padding-bottom: 0.714285714rem;
	text-indent: -16px;
}
ul.list-icon-ok li:before {
	color: #6ba420;
	padding-right: 10px;
	padding-right: 0.714285714rem;
	content: '\f00c'; /* fa-check */
	display: inline-block;
	text-rendering: auto;
	-webkit-font-smoothing: antialiased;
	-moz-osx-font-smoothing: grayscale;
	font: normal 20px/1 'FontAwesome';
	vertical-align: text-bottom;
}
How it looks in real life:
Let's try CSS class list-icon-hand-right :
Using icon webfont to style links to PDF and other documents
You can always invoke document icons with classes on any HTML element: icon-pdf, icon-word, icon-excel, icon-powerpoint, icon-archive-file.
The example code:
<a class="icon-pdf" href="#">PDF file</a>
<a class="icon-word" href="#">Word file</a>
<a class="icon-excel" href="#">Excel file</a>
<a class="icon-powerpoint" href="#">PowerPoint file</a>
<a class="icon-archive-file" href="#">ZIP file</a>
Would produce:
PDF file
Word file
Excel file
PowerPoint file
ZIP file
To make things even better, you can enable automatic icon placement on any link to a document! No need to manually add CSS classes, etc. Open style.css, find Tip23 and uncomment next block of CSS rules.
Using icon webfont with CDN caching
Apparently there are some issues displaying icon webfont from CDN cache, especially using FireFox web browser. There are several possible ways how to fix it.
First way is to use BootstrapCDN version of Font Awesome icon font, check Section 5.7b of functions.php (Section 2.6 if you are using a child theme). Most likely you will have to exclude this file, so it will not be loaded by your primary CDN service provider, check your CDN's manual how to do that.
Second way is to use special .htaccess rules, see: Serving Fonts from CDN.
Third way is to modify functions.php and /css/font-awesome.min.css files to avoid using relative paths in @font-face when importing font files. This solution is generously provided by Martin Hawksey, please check his solution @ GitHub: Fix for elusive webfonts for blogs with CDN
Here is a short version of changes you have to make:
functions.php code:
wp_enqueue_style( 'font-awesome-iconfont-style-local', get_template_directory_uri() . '/css/font-awesome.min.css',schould be changed to:
wp_enqueue_style( 'font-awesome-iconfont-style-local', get_template_directory_uri() . '/css/font-awesome.min.php?url='.urlencode(get_template_directory_uri()),File /css/font-awesome.min.css should be renamed to /css/font-awesome.min.php and code:
@font-face {
font-family: 'FontAwesome';
src:url('../inc/fonts/fontawesome-webfont.eot');
src:url('../inc/fonts/fontawesome-webfont.eot?#iefix') format('embedded-opentype'),
	url('../inc/fonts/fontawesome-webfont.ttf') format('truetype'),
	url('../inc/fonts/fontawesome-webfont.woff') format('woff'),
	url('../inc/fonts/fontawesome-webfont.svg#fontawesomeregular') format('svg');
schould be changed to:
@font-face {
font-family: 'FontAwesome';
src:url('<?php echo $ur; ?>/inc/fonts/fontawesome-webfont.eot');
src:url('<?php echo $ur; ?>/inc/fonts/fontawesome-webfont.eot?#iefix') format('embedded-opentype'),
	url('<?php echo $ur; ?>/inc/fonts/fontawesome-webfont.woff') format('woff'),
	url('<?php echo $ur; ?>/inc/fonts/fontawesome-webfont.ttf') format('truetype'),
	url('<?php echo $ur; ?>/inc/fonts/fontawesome-webfont.svg#fontawesomeregular') format('svg');
Recommended reading: Bulletproof @font-face Syntax
P.S. The CDN fix is not included in the theme by default, because under normal circumstances (not using CDN) it would cause a small speed penalty.
Embedding code in the post
To embed code in the post, first it should be escaped. For this purpose use simple, but effective online tool Postable.
To embed in-line code, just select the escaped text and use editor's code button to get this Bootstrap-style appearance: .sample-class Some small parts of code may be used without escaping, but if you don't know exactly, it's always better to run your code through linked tool, just to be sure, that you will not break your site.
To embed larger chunk of code, wrap all code in:
<pre><code>Your escaped code goes here...</code></pre>This code appearance is not very fancy and there is no syntax highlighting, but you don't need any plugins, that might slow your website down. Example code:
// Adding CSS file of the Child theme.
wp_register_style( 'tinyforge-child-style',
get_stylesheet_uri(),
array(),
'1.0',
'all' );
Custom CSS classes
Tiny Framework greatly extends the automatically included CSS classes that make life much easier when you need to customize the look of your site. Extended CSS classes include:
- HTML
.jsand.no-js- to handle those specific cases when JavaScript is disabled - BODY
.list-view- index, archive, category, tag views - BODY
.singular- single views (posts and pages) - BODY - category (or any other taxonomy) class (slug) for single posts
- BODY - page slug class for pages
- BODY
.full-width- using a full-width layout, when no active widgets in the sidebar or full-width template - BODY
.template-front-page.has-post-thumbnail.two-sidebars- Front Page template: thumbnail in use and number of sidebars for widget areas - BODY
.custom-background-empty.custom-background-white- white or empty background color to change the layout and spacing - BODY
.custom-font-enabled- cstom fonts enabled - BODY
.wp-custom-logo.has-site-logo - BODY
.header-image-yes.header-image-no- presence of header image - BODY
.title-tagline-hidden- the site title and tagline is hidden - BODY
.footer-widgets- presence of footer widget(s) - BODY
.group-blog- site with more than 1 published author - BODY
.single-author- site with a single author - POST
.has-thumbnail- non-password protected page with a post thumbnail
Avoiding possible naming conflicts
Custom CSS classes introduce a small chance for naming conflicts, but it doesn't outweigh great benefits of having these extra classes. In unusual circumstances post/page or category could be named as some other existing CSS class. To prevent it, I compiled a list of the category or post/page names to avoid:
- attachment
- custom-background
- custom-font-enabled
- full-width
- footer-widgets
- has-thumbnail
- has-post-thumbnail
- header-image
- list-view
- single-author
- singular
- template-front-page
- two-sidebars
Custom Action Hooks
Tiny Framework integrates Theme Hook Alliance hooks and ads one more action hook example, see Tip87.
Suggested reading about action hooks:
Customizing WordPress Themes with Action Hooks
Adding Custom WordPress Hooks
Function Reference/add action
Custom Action Hooks are listed chronologically as they appear in the theme document structure:
- tha_html_before
- tha_body_top
- tha_head_top
- tha_head_bottom
- tha_header_before
- tha_header_top
- tha_header_bottom
- tha_header_after
- tha_content_before
- tha_content_top
- tha_entry_before
- tha_entry_top
- tha_entry_bottom
- tha_entry_after
- tha_comments_before
- tha_comments_after
- tha_content_bottom
- tha_content_after
- tha_sidebars_before
- tha_sidebar_top
- tha_sidebar_bottom
- tha_sidebars_after
- tha_footer_before
- tha_footer_top
- tinyforgeii_credits
- tha_footer_bottom
- tha_footer_after
- tha_body_bottom
Theme localization (translations)
Attention Tiny Framework translators, there is an easy way to translate Tiny Framework to your language.
Using online tool GlotPress
Tiny Framework translation templates can be found at: translate.wordpress.org. Most likely some of the strings will be already translated, you will have to translate only the remaining part 🙂 Just click on your language and start suggesting translations for the strings.
You may also find useful to read the GlotPress translator handbook.
Please note, that two strings: on and no-subset should not be translated into your own language, but copied over as it is in English. For some languages no-subset should be translated as the subset name, like: greek, cyrillic, devanagari or vietnamese.
Other resources you might find useful:
Additional coding Tips (81-100)
Just open related to the tip files in a text editor and search for a tip number, for example "Tip03" to find the code.
- Tip81 - Completely disable the Post Formats UI in the post editor screen - disabled by default (functions.php) - only in child themes
- Tip82 - No more jumping for read more link - disabled by default (functions.php) - only in child themes
- Tip83 - Make focused input fields glow (style.css)
- Tip84 - Remove error message on the login page - better for security reasons - disabled by default (functions.php) - only in child themes
- Tip85 - Add Social Links Menu (optional) (footer.php, style.css, inc/menu-social.php)
- Tip85b - Add Social Links Menu to header (optional) (functions.php, style.css) (only in child themes)
- Tip86 - Style social icons in the sidebar (optional) (style.css) - also in child themes
- Tip87 - Action Hook implementation example (footer.php, functions.php) - also in child themes
- Tip88 - Customize color scheme (style.css) - also in child themes
- Tip89 - Add custom image sizes to the editor (functions.php) - also in child themes
- Tip90 - Fine-tune Schema.org markup (inc/semantics.php)
- Tip91 - Set Next and Previous post links to be from the same category (taxonomy) as current post (single.php)
- Tip92 - Require authentication for all REST API requests - limit REST API exposure to bad guys (functions.php) - only in child themes
LESS dynamic stylesheet language support
Welcome to rapid development age - change the look and feel of your site in minutes! LESS support is provided via child themes, file located at: /css/style.less.
LESS adds much needed dynamic properties to CSS. It introduces variables, operations, function-like elements, even JavaScript into the mix. It will make your life hassle free by enabling you to write stylesheets with a modular mindset.
LESS is a superset of CSS. This means that all CSS code is valid LESS code but there are additional elements in LESS which would not be valid in CSS. This is great because your existing CSS is already valid LESS code, minimizing the learning curve to using LESS.
So how does this "rapid development" happen, you may ask. Take a look at the snippet of style.less file:
@mobile-menu-text-color: #fff; // white
@mobile-menu-background-color: #3a3a3a; // dark grey
@mobile-menu-background-color-hover: #474747; // grey
@mobile-menu-background-color-current-item: #117bb8; // blue

@site-title-color: #333; // dark grey
@site-title-color-hover: #fc9f00; // orange

@body-background-color: #e6e6e6; // grey - starts from minimum width of 960 pixels
@body-text-color: #333; // dark grey
@body-link-color: #0066cc; // standard blue
@body-link-color-visited: #800080; // standard purple
@body-link-color-hover: #fc9f00; // orange

@entry-title-color: #333; // dark grey
@entry-title-color-hover: #fc9f00; // orange
As you can see, from the very beginning you are presented with a clear list of many visual and functional aspects of the theme. You don't have to search whole style sheet to find the code, in 5 minutes you can cardinally change your theme!
Don't know how to use LESS dynamic stylesheet language? Start reading here: Get Into LESS: the Programmable Stylesheet Language.
Also see this video about LESS and other CSS preprocessors: CSS preprocessors with Jonathan Verrecchia.
Check the GUI compilers that use LESS. I prefer WinLess, because it uses latest version of Less.js and has clear compiler error messages.
Do not forget to replace original style.css file with the generated one or set the output path of the compiler to your main child theme folder, so original style.css file would be overwritten automatically.
Problems you might face
Cannot select a template for your WordPress page
Template option might be even missing from the edit screen. In my experience, it is not theme related.
First, check if default WordPress theme is installed (in this case it would be Twenty Fourteen). Activate default theme and then try to select any page template. After that revert back to your theme and since then everything should work normally.
Also try to see if you cannot select a template from page edit screen and from general Pages screen where you can do "Quick Edit" and select template there.
Menu in mobile view is not working
Usually this is an indication that JavaScript is not working on your site. The most common cause - a conflict with one or several installed plugins. Most likely that plugin will be a caching plugin.
To diagnose this issue, disable all plugins, see if navigation is working in mobile mode. Then try to re-enable plugins one by one, constantly checking mobile menu, until you will find the conflicting plugin.
If it was a caching plugin, try to disable JavaScript minification option or JavaScript caching at all in plugin's settings.


